|
Email Authentication
What is Authentication?
What is it used for?
Email Setup Instructions:
Netscape 7.1
Eudora 6.0
Outlook XP
Outlook Express XP.
Mozilla 1.5
Dialer Setup Instructions:
Change Settings XP.
Establishing New Dialer XP
SMTP Authentication is a transparent mechanism for our mail server to verify who you are. The server asks for your user name and password, which your mail program passes on. If you are verified as being a “real” yourdomain.com user, then you’ll be able to send and receive your email messages.
In the fight to stop Spam (junk mail, Unsolicited Commercial email, etc.), the rules that apply to mail servers acceptance of mail are getting ever stronger.
In order to set up mail clients to use SMTP Authentication, the following instructions should be used. Basically, SMTP Authentication needs to be enabled and set up to use the email address and password of the user in question. Below are instructions and screen shots for the most common mail software currently in use. Simply select the email client that you currently use from the list below. There you will find step by step instructions on how to change your email settings.
Go to top
Step 1:
Open the Netscape mail software, then go to Edit -> ‘Mail & Newsgroups Account Settings’, as pictured below in Fig 1.
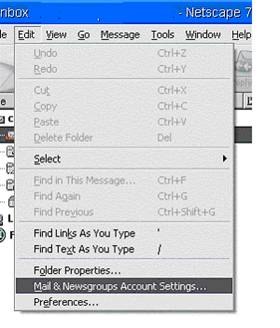
Fig 1.
Step 2:
On the left hand side of the dialog box, select ‘Outgoing Server (SMTP)’ (see Fig 2). Ensure that the Server Name is set to the correct mail server (smtp.yourdomain.com), and check the box that is labeled ‘Use name and password’. Enter the email address for the user in question in the text box labeled ‘User Name’. Click ‘OK’ to apply the settings.
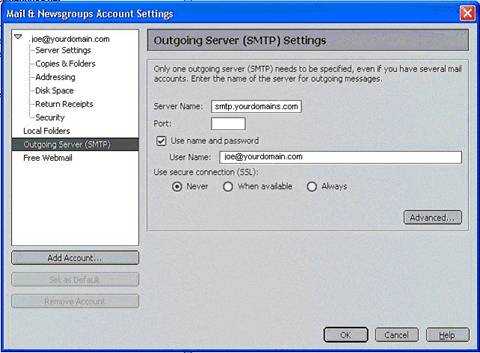
Fig 2.
Go to top
Step 1:
Open Eudora, and go to Tools -> Options as in Fig 3.
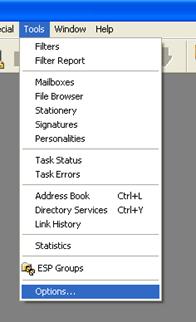
Fig 3.
Step 2:
On the “Getting Started” screen modify or confirm that your settings are set using your ISP domain in place of “yourdomain.com” “Mail Server (Incoming) Fig 4-A and “SMTP Server (Outgoing)” Fig 4-C
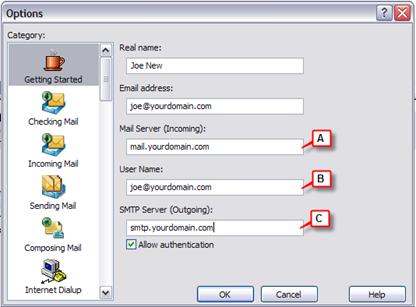
Fig 4
The “User Name option Fig 4-B should be set to your full email address.
Step 2:
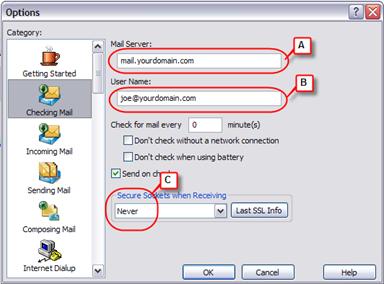
Select the “Checking Mail” icon on the left and confirm the following 3 areas.
- Mail Server – confirm and change if needed. This should display the mail settings from the previous screen.
- User Name – Confirm and change if needed. This should be your email address.
- Secure Sockets when Receiving – Confirm and change if needed. This option should be set to never. If you wish to receive secure email this o
Step 3:
Select the ‘Sending Mail’ icon on the left hand side. Check that the SMTP server is set to your outgoing mail server (smtp.yourdomain.com). See figure 4 for the following options.
- Email Address – confirm and change if needed. This should display the users email address from the previous screen.
- SMTP Server – Confirm and change if needed. Edit this entry to reflect your domain entry.
- Secure Sockets when Receiving – Confirm and change if needed. This option should be set to never. If you wish to receive secure email this option can be set at a later time.
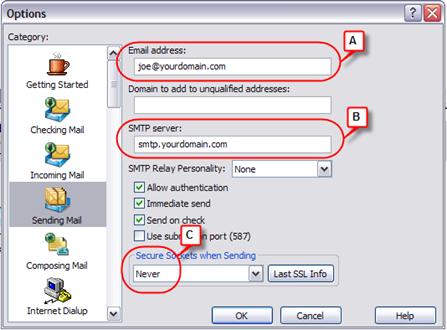
Fig 4.
Note:
IIn order for SMTP authentication to work with Eudora, it is important that the user credentials that are entered for the POP server are set to the email address for the username. i.e. joe@yourdomain.com instead of just joe.
Go to top
Step 1:
Open Outlook, then go to Tools -> ‘email Accounts’ as shown in Fig 5.
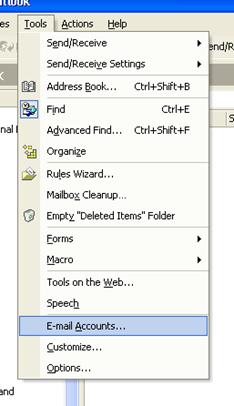
Fig 5.
Step 2:
When the email Accounts dialog box appears, select ‘View or change existing email accounts,' then hit ‘Next’ as shown in Fig 6.
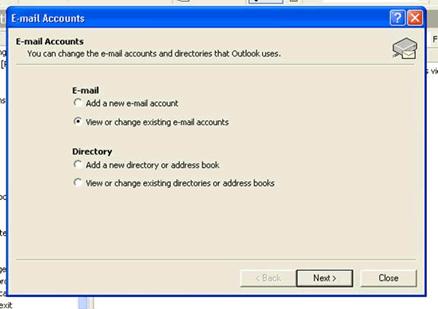
Fig 6.
Step 3:
When the dialog box with your email account(s) list comes up, select the account in question, and then click ‘Change’ as shown below in Fig 7.
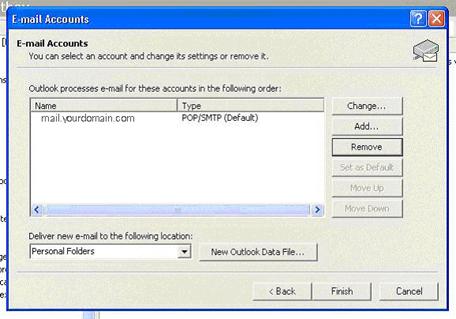
Fig 7.
Step 4:
When the screen for your email account comes up, ensure that the “Server Information” for “Incoming mail server (POP3)” and “Outgoing Mail Server (SMTP)” are set to the correct mail server (smtp.yourdomain.com) Fig 8-B.
In the “Login Information” area change the “User Name” to use your entire email address not just the user name Fig8-A
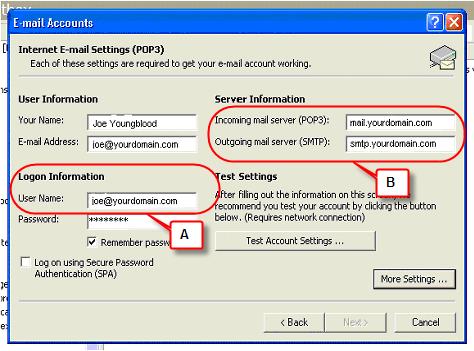
Fig 8.
The options under “User Information” is the email address that the person that you are sending email to will see as the from person. This information does don’t have any affect on the login details to the email account.
Once the detail above are confirmed then select the button in the lower right hand corner labeled ‘More Settings’ as shown in Fig 8.
Step 5:
Select the tab labeled ‘Outgoing Server’ when the dialog box pictured in Fig 9. appears. Select the box labeled ‘My outgoing server (SMTP) requires authentication.' Fig 9-A.
Next confirm that the “Use same settings as my incoming mail server” is selected like Fig 9-B.
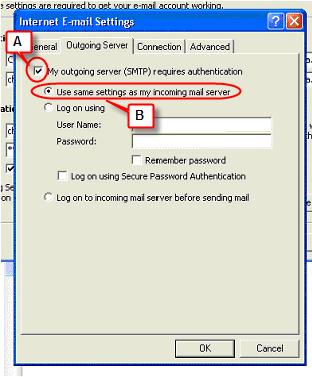
Fig 9.
By the user selecting the above options the client will use the same information to login as to what was entered n the previous screen see figure 8.
Go to top
Step 1:
Open Outlook Express and go to Tools -> Accounts as shown below in Fig 10.
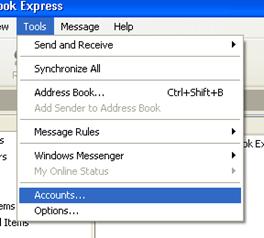
Fig 10.
Step 2:
When the ‘Internet Accounts’ dialog box appears, make sure the ‘Mail’ tab is selected, then highlight the account that you would like to change. Click the button labeled ‘Properties’.
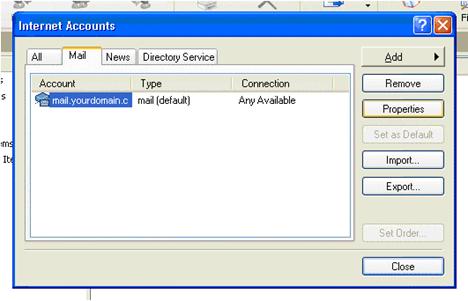
Fig 11.
Step 3:
When the ‘Properties’ tab appears, make sure the ‘Servers’ tab is selected. Ensure that the Outgoing Mail Server is set to the correct mail server (smtp.yourdomain.com). Select the box at the bottom of the dialog box labeled ‘My server requires authentication’ , then hit the button next to it labeled ‘Settings’ as shown below in Fig 12.
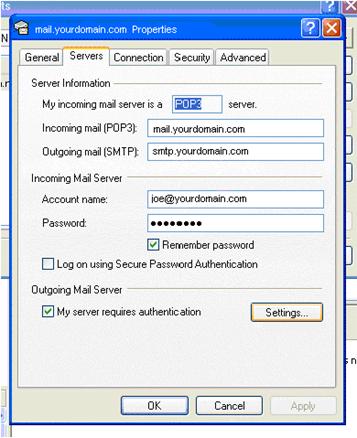
Fig 12:
Step 4:
Under the heading of “Logon Information” select the option labeled User same setting as my incoming mail server”, then click ‘OK’ as shown below in Fig 13-A.
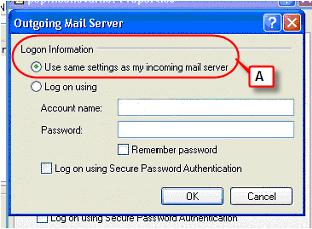
Fig 13.
Go to top
Step 1:
Open the Mozilla mail client, then go to ‘Edit’-> ‘Mail & Newsgroups Account Settings’ as shown below in Fig 14.
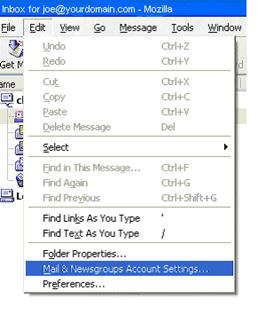
Fig 14.
Step 2:
When the dialog box appears, select the ‘Outgoing Server (SMTP)’ option on the left hand side. Ensure that the ‘Server Name’ text box contains the outgoing mail server for the account in question (smtp.yourdomain.com). Select the checkbox labeled ‘Use name and password’, and then enter the full email address of the user in the ‘User Name’ field. See Below in Fig 15. Hit ‘Ok’ to apply the settings.
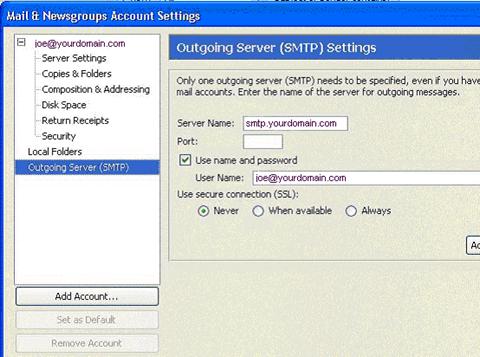
Fig 15:
Go to top
Step 1:
If you have the dialer Icon on your desktop then double-click the Icon. You should see fig 15.
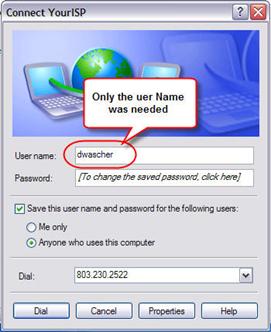
Fig. 15
Step 2:
Now add your entire email address into the space called User name. You should see fig 16.
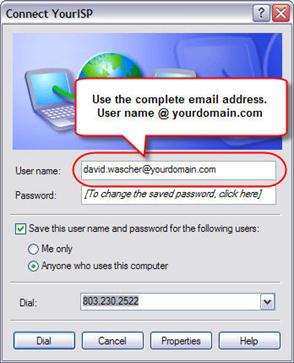
Fig 16.
Go to top
Step 1:
If you are not familiar with the manual setup processes for this feature please call you ISP technical support rep, they will walk you though the setup processes
Go to top
|